Good morning and welcome to another edition of Cards and Creations by Lori McBride. My name is Lori McBride and I’m a Stampin Up Independent Demonstrator from Joshua,TX.
Today I’d like to share with you a set of Cards that I created using one 6×6 Designer Series Paper and the new Polished Pink In Color.
I created these cards using the following template:
*Keep It Simple*
To keep it simple you can simple cut the DSP to the measurements provided above and adhere them flat to the Cardbase.
*Step It Up*
If you’re on your way to being an intermediate stamper, add matte bases to the DSP, some Stampin’ Dimensionals to the “Thank You” sentiment, add/or add some of the In Color Ribbon and Embellishments or Rhinestones.
*Supply List*
Polished Pink Cardstock
Polished Pink Classic Ink Pad
2021-2023 In Color DSP
Polished Pink Open Weaved Ribbon
Loose Flower Flourishes
2021-2023 In Color Jewels
Stampin’ Seal Adhesive
Stampin’ Dimensionals
Mini Glue Dots
*Other Helpful Supplies*
Take Your Pick Tool
Stampin’ Trimmer
Thank you so much for joining me today. I hope you’ll join me again soon for another edition. Until next time – Happy Stampin Everyone!
Good morning and welcome to another edition of Cards and Creations by Lori McBride.
My name is Lori McBride and I’m a Stampin up Independent Demonstrator from Joshua,TX.
Today, I’d like to share a cheat sheet for beginner stampers and those just graduating from Card Kits and looking for their next step forward in creating their own A2 Cardbases.
I know many times we as more intermediate and avid crafters just simply say, “A2” but I also understand that to a beginning stamper that may sound like a foreign language that they just aren’t familiar with and that’s okay.
I’ll admit I’m guilty of just saying “A2” rather than giving measurements although I really do try to give measurements for all of my projects sometimes I do admit that I get pressured for time.
I also wanted to Blog about this so than anyone reading, who’s brand new to stamping can refer back to this Blog at any time.
Our standard “A2” Cardbase is our simplest Cardbase and easiest to create and provides new stampers with four different options using the exact same measurements.
Let me share with you this chart that I found online:
This chart is perfect because it provides the exact measurements for all four cards.
There’s really only two products that I reccomend for creating your own cardbases. The Stampin’ Trimmer because it makes it easy to both cut and score cardbases and a bone Folder to really be able to burnish and fold those score lines well.
Thank you so much for joining me today. I hope that you’ll join me again soon for another edition and that sharing this chart will help beginner stampers on their journey to becoming intermediate and avid crafters in no time. Until next time – Happy Stampin Everyone!
For all of your Crafting needs visit my online store at:
Good morning and welcome to another edition of Cards and Creations by Lori McBride and I’m a Stampin Up Independent Demonstrator from Joshua,TX.
Today I’d like to share with you my Top 10 Retiring products from the January-June Mini Catalog. Beginning June 1st Stampin’ Up will do a Last Chance Sale. The sale is expected to run through June 30th however; products are not guaranteed to last the duration of the sales period. Stampin’ Up has stated “while supplies last” which means when they’re gone that’s it. No more will go into production or restocked. During this sale Stampin’ Up will drastically reduce their prices on many items although not all will be reduced.
*Love You Always*
Where part of this incredible Suite is going to carryover sadly we will say goodbye to the heart charms, Designer Series Paper, Designer Series Specialty Papers, Foil Sheets and the Blushing Bride Metallic Ribbon from the Suite.
*Soar Confidently*
There’s no doubt that my Number Nine pings my heart just a little bit. Soar Confidently was a great set for masculine Cards of all types but I also found that they made awesome graduation cards.
*Sand & Sea Designer Series Paper*
Number Eight is part of a Suite that I absolutely fell in love with and I’m absolutely thrilled that the majority of the Suite will carryover. The Designer Series Paper doesn’t come as a surprise that it’s retiring as we said goodbye to both Rococo Rose and Seaside Spray this year but I really will miss the stunningly beautiful DSP that was part of the Suite.
*Happy Thoughts Stamp Set*
My heart sank when I saw my Number Seven on the Retirement list. The Happy Thoughts Stamp Set was a great Stamp Set not only because it was designed by one of our Million Dollar Achievers but also because it was a great sentiment Stamp Set and stamped absolutely perfectly inside our punches and die cuts. I used the Happy Thoughts Stamp Set on so many of my projects that it’s going to be really hard to let this one go.
*Ride The Range Bundle*
I’m from Texas and I’m a country girl to boot (pun totally intended) so you can imagine my excitement to see the Ride The Range Bundle and then my sadness to see it on the Retirement List. My Number Six will surely be missed.
*Hot Dog Stamp Set*
I have Chiweinnies so of course the Hot Dog Stamp Set would make my Number Five.
*Sprintime Joy*
My number four is Springtime Joy. I created so many adorable projects using Springtime Joy that it’s really difficult to see this one Retire.
*Baby Pull Toys*
My Number Three is the Baby Pull Toys Stamp Set. We’ve welcomed so many new babies into our lives since January and it has certainly been an adorable one to create and work with.
*Wrapped Bouquet*
My heart sank quite a bit seeing that Wrapped Bouquet is on the Retirement List. Of all of the “flowery” stuff that Stampin’ Up has offered and still offers, the Wrapped Bouquet Bundle has been my favorite. It’s no wonder she’s my Number Two.
*Borders To Backgrounds*
I have had SO much fun creating with the Borders To Backgrounds Stamp Set. I considered Borders To Backgrounds to be one of those “hidden gems” of the January-June Mini Catalog. It was a fabulous Stamp Set to create simple, fun and adorable Cards with and it’s no wonder that it is my Number One!
The full list of everything that’s retiring from the January-June Mini Catalog can be found on my Cards and Creations by Lori McBride Facebook Page. I hope that you’ll scoop on these great Sets, Suites and Bundles that remain on your Wishlist and will have the opportunity to save that 10% on Bundled Savings and take advantage of the Sale when it begins for up to 60% savings by visiting my website and shopping at:
Good afternoon and welcome to another edition of Cards and Creations by Lori McBride. My name is Lori McBride and I’m a Stampin Up Independent Demonstrator from Joshua,TX.
Today, I’d like to share with you a message directly from Stampin’ Up regarding the *Bunches of Fun Cling Stamp Set*
We as Demonstrators can’t help but to be a little bit giggly at the error but again there’s no action needed on anyone’s behalf as Stampin’ Up is already on top of replacing it.
If this Stamp Set is on your Wishlist we apologize that it’s in not orderable status but can reassure you that it will be available with the correct spelling as soon as possible.
Thank you so much for joining me today. I hope that you’ll join me again soon for another edition. Until next time – Happy Stampin’ Everyone!!
Good morning and welcome to another edition of Cards and Creations by Lori McBride.
My name is Lori McBride and I’m a Stampin Up Independent Demonstrator from Joshua,TX.
Not all moments in our lives or the lives of family members are “happy” ones. I used to dispise having to make Sympathy Cards. Mainly because it means that someone close to me is hurting.
I did find a balance with them and I found that making them in advance when needed helped tremendously and I found that when I was in a really good place making them in love was comforting to those on the receiving end.
I found that sending a beautiful card in a person’s absolute worst moments can bring a moment of joy, a moment of comfort, a moment of peace. I didn’t know that a card could do that.
*Supply List*
Elegantly Said Bundle
Gold Satin Ribbon
Gold Glitter Enamel Dots
Gold Embossing Powder
*Ink*
Versamark
Momento Black
*Cardstock*
Basic Black
Basic White
Gold Foil
*Adhesives*
Stampin’ Seal
Stampin’ Dimensionals
Multipurpose Liquid Glue
*Other Helpful Supplies*
Heat Tool
Stamparatus
Take Your Pick Tool
Thank you so much for joining me today and I hope that you’ll join me again soon for another edition.
Good morning and welcome to another edition of Cards and Creations by Lori McBride and our Team Stamp It Monthly Blog Hop. My name is Lori McBride and I’m a Stampin’ Up Independent Demonstrator from Joshua, Texas. The theme of our Blog Hop this month is Father’s Day.
For today’s project I’d like to share with you a fabulous Fun Fold Father’s Day Card created with a handful of Stampin’ Up’s masculine products available in both the January-June Mini Catalog and the 2021-2022 Annual Catalog.
Left Pic – Inside Cardbase Left Pic – Card Front
*Measurements*
Basic Grey Cardbase 4 1/4″×11″ scored at 2 1/2″ and 5 1/2″
Smoky Slate Card Front 4 1/4″×5 1/2″
Well Suited Strips randomly cut beginning at 1/4″ and stopping at 3/4″in width and not exceeding 2 1/2″ in height. There are 13 total strips total.
Inside Cardbase 4″×5 1/4″
*Instructions*
Adhere your card front to your card base using Multipurpose Liquid Glue.
Adhere your larger strips down to the card front using Stampin’ Seal Adhesive and use Mini Stampin’ Dimensionals to adhere smaller strips overlapping larger strips of DSP.
Die cut a scrap of Basic White Cardstock using your Stampin’ Cut and Emboss Machine.
Stamp the Sentiments using the May “Batter Up” Paper Pumpkin Kit in both Momento Black and Smoky Slate Inks.
Tie a bow using the Well Suited Twine Combo Pack and add to the front of the die cut using Mini Glue Dots. Add Black Matte Dots to both sides. Use Stampin’ Seal Adhesive to adhere the label to the front of the card.
For the inside card base I stamped the father holding the little girl image from the “A Good Man” Stamp Set and hand colored with the Stampin’ Blend Markers and stamped the “good man” sentiment in Momento Black Ink.
At this time I’d like to Congratulate the WINNER from last month’s Blog Hop:
Thank you so much for joining me today. I hope that you’ll continue to Hop along with all of the other very talented ladies on our Team and will join me again soon for another edition.
Good morning and welcome to another edition of Cards and Creations by Lori McBride.
My name is Lori McBride and I’m a Stampin up Independent Demonstrator from Joshua,TX.
Today, I’d like to share with you the card that I created for the #SUColorChallenge using the brand new *Elegantly Said Bundle* from the new 2021-2022 Annual Catalog.
Our colors for May are:
I love the #SUColorChallenge and look forward to the Challenge each and every month. The colors they choose for this challenge wow me, inspire me and get me thinking outside the box each and every month.
*Supply List*
Elegantly Said Bundle
Pastel Pearls
Gorgeous Grape Ribbon
*Cardstock*
Gorgeous Grape
Basic White
*Ink*
Gorgeous Grape
Soft Suede
Mint Macaron
Thank you so much for joining me today. I hope you’ll join me again soon for another edition.
Good morning and welcome to another edition of Cards and Creations by Lori McBride. My name is Lori McBride and I’m a Stampin’ Up Independent Demonstrator from Joshua, TX.
Today I’d like to share with you four alternate projects using the May 2021 “Batter Up Kit.” Each project is both unique and different and use different elements of the kit plus just a few little added somethings.
To be quite honest, I was not thrilled with this kit. It was advertised as “all inclusive” regardless of gender but it is not. It was not the coordinating colors that bothered me as much as it was that there was no “daughter” sentiment in the stamp set.
I know that MANY had reached out to both Paper Pumpkin and Stampin’ Up and specifically asked about gender neutrality and we were specifically told that it was a gender neutral kit. It was advertised as “for all of the All Stars in your life.” Apparently, they forgot that girls play softball and baseball too.
I couldn’t help but to feel both disappointed and angered and believe me when I say that Stampin’ Up is most definitely going to hear about this one.
I will say this – through that disappointment and anger came a determination to create SOMETHING suitable for our girls hitting home runs in the fields using different elements of the kit.
For my first alternate, I used the Soft Suede woodgrain Cardbase, the bats, the red label from the kit, the “softball” (as we’re calling it for these projects) and the white twine.
I had my Customers cut one of the cardbases that I couldn’t think of an Alternate down to 4″×5 1/4″. Using a ruler and Stampin’ Blend Markers we created our own feminine DSP. I also had them flip over the red label and use the Stampin’ Blend Markers to create a Flirty Flamingo ombre label.
The two colors we used to create our own DSP were Dark Flirty Flamingo and Dark Pool Party.
My second Alternate project also took components from the kit for a nice “feminine copycat” project. I had Customers flip over the red and yellow die cut and use the Stampin’ Blend Markers and a ruler to create their own label. I also traded the Night of Navy Ink Spot out for a Pool Party Classic Ink Pad and again added Silver Epoxy Essentials.
I used the base from the Kit, the label from the Kit and the Basic White twine from the Kit.
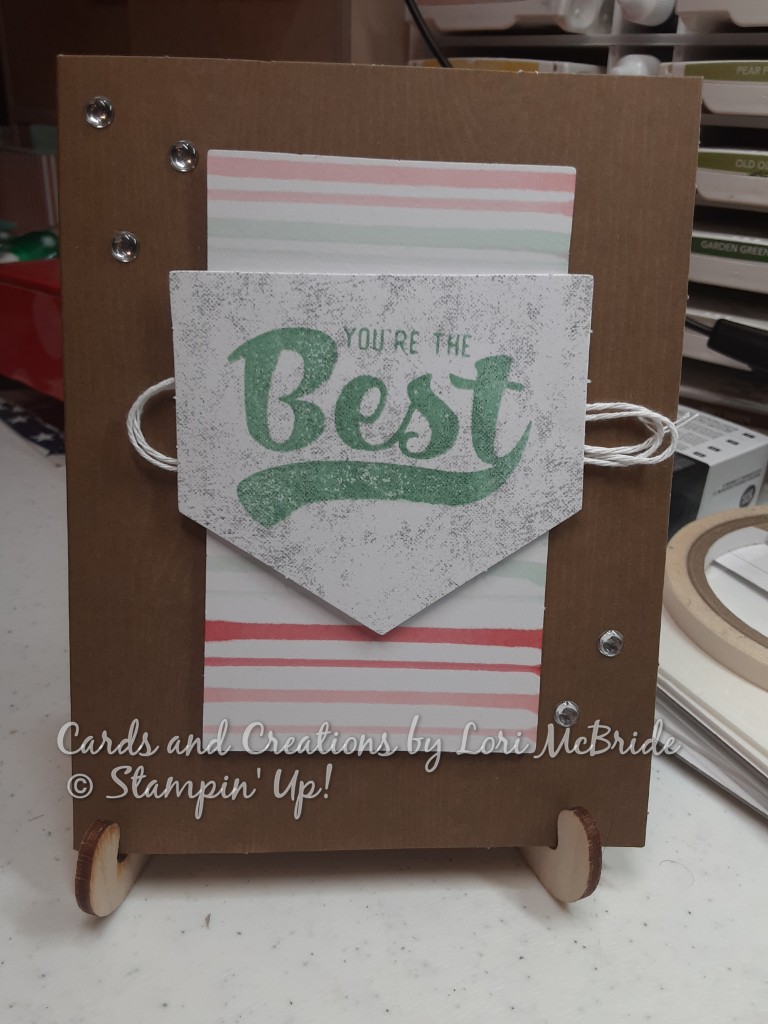
For our third Alternate project we created our own Cardbase from Pool Party Cardstock, added a Matte Base in Flirty Flamingo measuring 4″×5 1/4″ 1/4″, again cut down a Cardbase we weren’t going to use to measure 3 3/4″×5″ to create a Mount Base.
We stamped the Mount Base in Flirty Flamingo ink and randomly stamped the bat, helmet and “All Star” sentiment.
We stamped the “You’re The Best” sentiment on the base in Pool Party Ink and added three lines of Stampin’ Seal Adhesive to the back and then ran the Flirty Flamingo Metallic Ribbon to the back and clipped it off with a pair of Paper Snips.
Using Stampin’ Seal we adhered the Mount Base to the Matte Base and added Stampin’ Dimensionals to the back of the “home plate” die cut and adhered it to the center of the Mount Base and then added Stampin’ Dimensionals to the back of the Matte Base and adhered it to the Cardbase.
We added three Silver Epoxy Essentials to the front of the card.
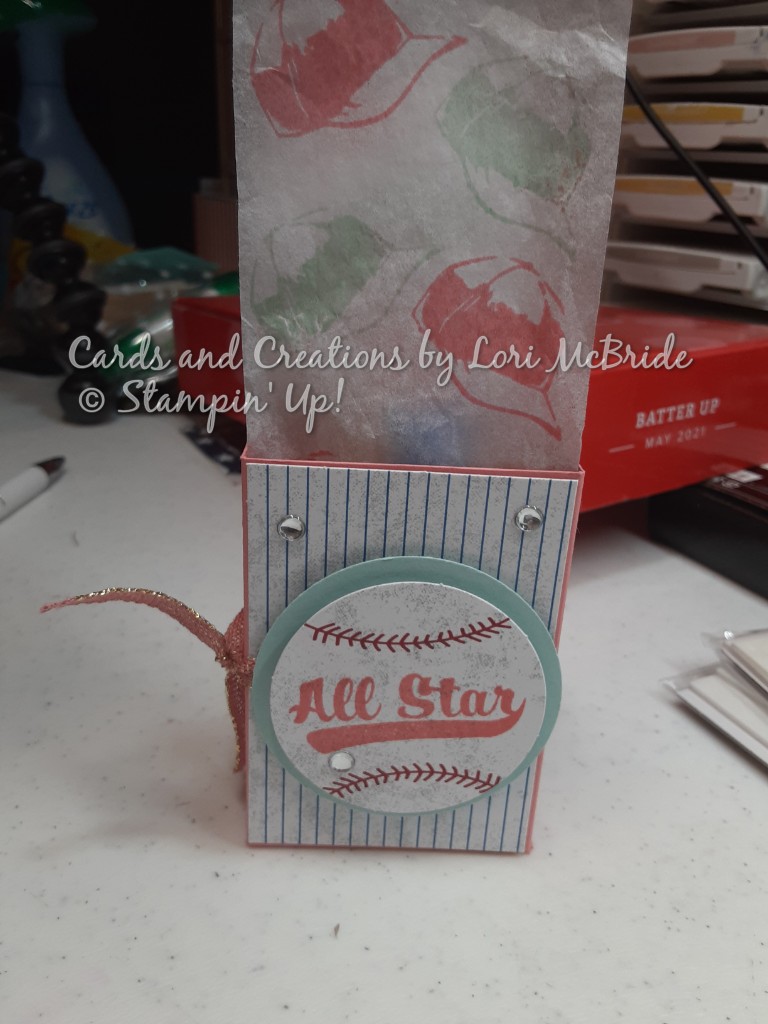
For our fourth and final Alternate Project using the May 2021 “Batter Up” Kit, we created a box out of Flirty Flamingo Cardstock. I’ll provide exact measurements below in just a minute. Using our Stampin’ Trimmer we cut a specific length and height from the “pinstripe” cardbase from the Kit and adhered it to the front of the box. Using the 2 1/2″ Layering Circles Dies we die cut a circle using our Stampin’ Cut and Emboss Machine. We stamped the “All Star” sentiment from the Kit Stamp Set in Flirty Flamingo Ink and added Stampin’ Dimensionals to the back of the “softball” die cut and added it to the center of the Pool Party Circle.
We wrapped the Flirty Flamingo Metallic Ribbon around the box tightly and tied a knot to the side. We added more Silver Epoxy Essentials to the softball and front of the box.
We used some plain White tissue Paper, we put it in the Stampin’ Trimmer and trimmed it at 2″x9″ We stamped the “helmet” image from the Kit Stamp Set in Flirty Flamingo and Pool Party Inks. When the ink dried, we put the tissue paper in the box and put the three bubble gums in the box.
Which by the way, Double Bubble is NOT the official gum of the MLB.
*Box Measurements*
Flirty Flamingo Cardstock 4 1/4″×7″ scored at 2 1/4″, 3 1/4″, 5 1/2″ and 6 1/2″ on the Landscape (long 7″ side) and scored at 1″ on the Portrait (4 1/4″ short side) side.
Pinstripe Cardbase – 2 1/8″×3 1/8″
*Box Instructions*
Cut off small Rectangle created by score lines. Trim up the squares to the score line and slightly wedge out with paper snips.
Use Bone Folder and burnish all score lines well.
Add Tear and Tape to thin edge where we cut out the small rectangle out and adhere to the other side. Fold the ends in and add Tear and Tape to the bottom flap, fold up and adhere.
*Personal Note*
This is not a drive against boys and men. The same box with the tissue paper can easily be recreated using Real Red, Night of Navy, Bumblebee or Basic Black. These alternate projects weren’t designed to discriminate against boys or men. I’m going to be doing some boy/men alternates soon for the upcoming Team Blog Hop using this Kit so stay tuned!
*Closing Thoughts*
When life gives you lemons – Make Lemonade and that’s EXACTLY what we did today. I can PROMISE you that there are going to be people out there who are just as frustrated, upset and disappointed with this Kit as I was and I can PROMISE you that Stampin’ Up and Paper Pumpkin WILL be hearing from MANY of us regarding this but I hope that this Blog will reach MANY looking for alternative projects using this Kit. I don’t know WHAT they were thinking but I hope with what I was able to share will help those looking for alternative ideas for their softball loving daughters and their teammates and coaches!!
Thank you so much for joining me today. I hope you’ll join me again soon for another edition. Until next time – Happy Stampin Everyone!!
Good morning and welcome to another edition of Cards and Creations by Lori McBride. My name is Lori McBride and I’m a Stampin Up Independent Demonstrator from Joshua,TX.
Today I’d like to share with you this fun fold card that I made for my niece’s birthday showing the new 2021-2023 In Colors in a little different way.
The most amazing part of this year’s 2021-2023 In Color Collection is how amazing the colors are with one another. Our Color Combination today is:
Polished Pink, Fresh Freesia and Pale Papaya
Today’s project also features Stampin’ Up’s brand *NEW* Scalloped Contours Dies as well as just a few other little goodies from my craft room.
*Supply List*
Sweet Ice Cream Bundle
Sweet Ice Cream DSP
Scalloped Contours Dies
*Cardstock*
Polished Pink
Fresh Freesia
Basic White
*Classic Ink Pads*
Polished Pink
Fresh Freesia
Pale Papaya
Cinnamon Cider
*Embellishments*
2021-2023 In Color Jewels
Pale Papaya Sheer Ribbon
*Adhesives*
Mini Glue Dots
Multipurpose Liquid Glue
Stampin’ Dimensionals
*Tools*
Stampin’ Trimmer
Stampin’ Cut & Emboss Machine
Take Your Pick Tool
2″ Circle Punch
Stamp Shammy
*Instructions*
This is the easiest way I can explain the Cardbase for a fun fold. Start with our A2 Cardbase (4 1/4″×11″ scored at 5 1/2″) and cut 3″ off one end.
I used the largest of the Scalloped Contours Dies to form the card front in Polished Pink Cardstock. I used the same die to die cut Basic White Cardstock for the inside Cardbase.
Using the 2nd largest die in the Scalloped Contours Dies I die cut the DSP. I added Stampin’ Dimensionals to the back of the DSP and attached it to the front of the Scalloped Polished Pink Cardfront.
I added Multipurpose Liquid Glue to the 2 1/2″ piece of the Cardbase and adhered the Cardfront to it.
I stamped the ice cream in the Polished Pink, Fresh Freesia and Pale Papaya Inks and punched them out using the ice cream punch. The cone was stamped in Cinnamon Cider and punched out using the same punch. I adhered the ice cream cone to the card front using Mini Glue Dots.
I punched the circle using the 2″ Circle Punch and stamped the “so cool” sentiment in Fresh Freesia Ink and adhered it down with Multipurpose Liquid Glue.
I tied a bow with the Pale Papaya Ribbon and glued it to the bottom of the Circle with Mini Glue Dots. I added the In Color Jewels to the top of the ice cream and the sentiment circle.
I know that the photo makes it appear that my scallops are out of alignment but they’re not. When this card is closed and it’s laying flat you can not see the Basic White Scallops. The card stand that I use for all of the photographs of my Cards has the front slightly ajar so just a touch of the Basic White Scallops show.
To make sure that I got the alignment of the Polished Pink Scallops and the Basic White Scallops just right, I added Multipurpose Liquid Glue to the back of the Basic White Scallops and lined it up with the Polished Pink Scallops and lowered it down into the Cardbase.
The inside of the card is stamped with the “Happy Birthday” sentiment from the Sweet Ice Cream Stamp Set.
Thank you so much for joining me today. I hope that you’ve enjoyed this tutorial and will join me again soon for another edition.